
In today’s interconnected business world, securing data as it travels between different locations is crucial. One of the most effective tools for this is IPSec VPN. Let’s dive into what this technology is and how it protects your valuable data flows.
What is IPSec?
IPSec (Internet Protocol Security) is a secure communication method that allows two or more networks to communicate over an untrusted network, typically the internet, as if they were directly connected. It creates an encrypted tunnel between the sites, ensuring that all data passing through is protected.

🔐 How It Works:
- Tunnel Establishment: The VPN gateways at each site authenticate each other and negotiate the encryption parameters.
- Data Encapsulation: Data packets are encapsulated within new IP packets and encrypted before transmission.
- Secure Transmission: The encrypted packets travel through the public internet within the established tunnel.
- Decryption at Destination: The receiving VPN gateway decrypts the data and forwards it to the intended recipient on the local network.
The Evolution of VPN Security: Understanding IKE Versions
In the world of IPSec VPNs, the Internet Key Exchange (IKE) protocol is crucial for establishing secure connections. This protocol has evolved significantly over time, adapting to new security challenges and network environments.
IKEv1, introduced in 1998, was the pioneer. It uses a two-phase negotiation process to establish encrypted tunnels. While effective, it began to show limitations as networks grew more complex.
Enter IKEv2 in 2005, later refined in 2014. This wasn’t just an update, but a complete overhaul. IKEv2 streamlined the negotiation process into a single phase, making connections faster and more resilient. It also brought enhanced security features, improved NAT handling, and better support for mobile VPNs through MOBIKE.
The choice between IKEv1 and IKEv2 often depends on compatibility needs. While IKEv2 is superior in many ways, some legacy systems may only support IKEv1.
Looking ahead, IKEv2 is set to become the standard as older systems phase out. Its improved security, performance, and flexibility make it the preferred choice for modern VPN implementations.
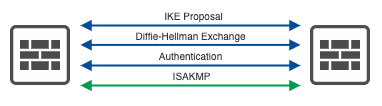
IPSec Tunnel Setup: Understanding Phase 1 and Phase 2
The establishment of an IPSec VPN tunnel occurs in two distinct phases, each serving a crucial role in creating a secure connection.
Phase 1: IKE (Internet Key Exchange) Negotiation
Phase 1 is all about setting up a secure channel for further negotiations. Here’s what happens:
- Authentication: The VPN peers authenticate each other, ensuring they’re talking to the intended party.
- Diffie-Hellman Exchange: This process allows the peers to generate a shared secret key over an insecure medium.
- Security Association (SA) Establishment: The peers agree on encryption and authentication algorithms, creating an ISAKMP (Internet Security Association and Key Management Protocol) SA.
Phase 1 can operate in two modes:
- Main Mode: Offers better security but requires more exchanges.
- Aggressive Mode: Faster but less secure, as it transmits some information unencrypted.
Phase 2: IPSec Negotiation
Once Phase 1 establishes a secure channel, Phase 2 negotiates the actual IPSec tunnel:
- Security Protocol Agreement: Peers decide on using either AH (Authentication Header) or ESP (Encapsulating Security Payload).
- Encryption and Authentication Algorithms: They agree on specific algorithms for data protection.
- Traffic Selectors: The peers define which traffic should be encrypted and sent through the tunnel.
- IPSec SA Establishment: A pair of unidirectional SAs is created for the IPSec tunnel.
Phase 2 uses Quick Mode, which is faster than Phase 1 as it operates over the already secure channel.

Key Differences:
- Purpose: Phase 1 secures further negotiation; Phase 2 sets up the actual data tunnel.
- Frequency: Phase 1 occurs less frequently; Phase 2 can be renegotiated more often for perfect forward secrecy.
- Security Associations: Phase 1 creates an ISAKMP SA; Phase 2 creates IPSec SAs.
IPSec VPN: Policy-Based vs. Route-Based Modes
When implementing IPSec VPNs, network administrators often choose between two modes: policy-based and route-based. Each has its own characteristics and use cases.
Policy-Based VPNs:
Policy-based VPNs use specific security policies to determine which traffic should be encrypted and sent through the VPN tunnel. These policies typically define source and destination networks, along with the types of traffic to be encrypted.
Route-Based VPNs:
Route-based VPNs treat the IPSec tunnel as a routable interface. Traffic is directed into the tunnel based on the routing table, rather than on specific security policies.
Vendor Influence on IPSec VPN Mode Selection
It’s important to note that the availability and implementation of policy-based and route-based IPSec VPN modes can vary significantly depending on the firewall vendor.
Some vendors may offer robust support for both modes, allowing administrators to choose freely based on their network requirements. Others might favor one mode over the other, providing more advanced features or easier configuration for their preferred mode.
For example, Cisco ASA firewalls traditionally leaned towards policy-based VPNs, while Palo Alto Networks firewalls are known for their strong support of route-based VPNs.
✅ Recommendations
Cryptographic Best Practises
It’s important to use strong encryption to ensure robust security. Enable Perfect Forward Secrecy (PFS) to keep session keys secure. For integrity and authentication, use strong hash algorithms, avoiding weaker options, below is a list for my current recommendations.
IKE & IPSec Encryption
| Algorithm | Specification | Preference |
|---|---|---|
| AES-256-GCM | RFC8247 | 🥇 |
IKE & IPSec Integrity Hashing
| Algorithm | Specification | Preference |
|---|---|---|
| HMC-SHA2-512 | RFC4868 | 🥇 |
| HMC-SHA2-384 | RFC4868 | 🥈 |
| HMC-SHA2-256 | RFC4868 | 🥉 |
Diffie-Hellman Exchange
| Group | Name | Specification | Preference |
|---|---|---|---|
| 21 | 521-bit random ECP group | RFC5903 | 🥇 |
| 20 | 384-bit random ECP group | RFC5903 | 🥈 |
| 19 | 256-bit random ECP group | RFC5903 | 🥉 |
| 16 | 4096-bit MODP Group | RFC3526 | 4 |
| 15 | 3072-bit MODP Group | RFC3526 | 5 |
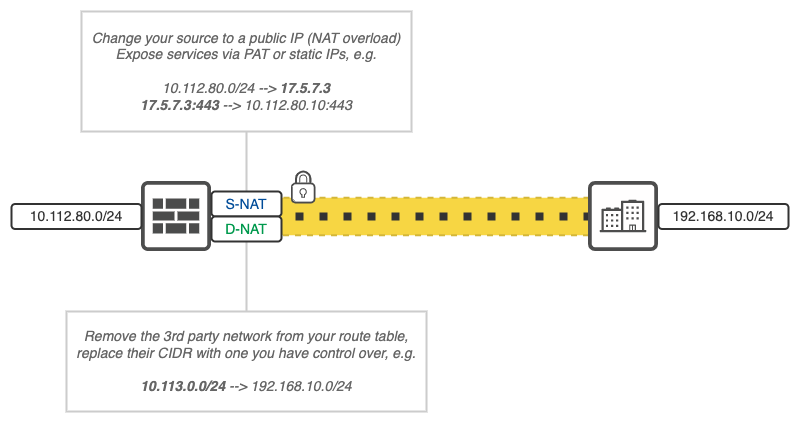
NAT’s Importance in 3rd party Connectivity
Using NAT with VPNs helps make your network safer. NAT hides your network’s inner setup by masking private IP addresses. This makes it hard for outsiders to see how your network is laid out. NAT also cleans up your route tables, hiding 3rd party networks and making it possible to group all external connections to a specific CIDR range.
My recommendation is to always use both source and destination NAT when peering with another company or 3rd party. Preferably (if you own your own public CIDR) you allocate some of your public IPs for this reason, only exposing your services and source traffic over a public IP you own.
Note that the IP address or network you will hide yourself behind have to be used in the traffic selectors.
NAT with DNS Mapping
Let’s say you need to access a web destination over the VPN where you use NAT, if you access this destination over the IP, e.g. https://10.113.0.10/. Apart from TLS/SSL errors, you will probablyalso experience the following challanges:
- IP addresses can change, while domain names stay the same.
- Some web applications may not function correctly due to:
- Host headers: Many apps use the HTTP host header to determine which site to serve.
- Hardcoded references: The app might have internal links or resources that use the domain name instead of relative paths.
- Security settings: Some apps have security measures that check the domain name to prevent unauthorized access.
- Cookies and sessions: These are often tied to specific domains and may not work properly with just an IP.
- Cross-origin resource sharing (CORS): CORS policies are typically set up using domain names, not IPs.

If the destination is resolvable via DNS, either over the tunnel or publically this can be solved by also translating the DNS response to the correct IP. This can be done on all major firewall and router brands.
This has to be done on a device that the DNS response packet traverses.
Examples and Links
Cisco ASA
nat (inside,outside) source static 192.168.10.23 10.113.0.23 dns
!
policy-map global_policy
  class inspection_default
    inspect dns
FortiGate
config firewall dnstranslation
    edit 1
        set src 192.168.10.23
        set dst 10.113.0.23
        set netmask 255.255.255.255
    next